

See for demo with download here.
Both Irina and Pat asked me to make a video recently. My first thought was: have you seen what I threw away in the past week?! :) Well, a video I cannot do, but I can do a step by step photo series. You know I am absolutely no expert nor a teacher, but I can share what I have learned.
I used the same reference photo of the pears in my previous post, it is Challenge nr. 1 of Paint and Draw Together.
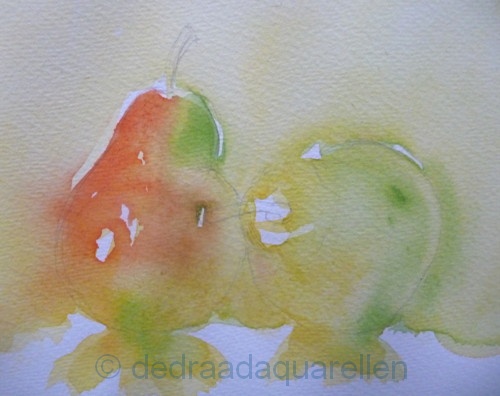
I made a quick drawing and started painting the pears and most of the background yellow, careful to leave the highlights white.

While that was still wet....

....I added sapgreen.... and vermillion red.

When the red threatened to take over the whole pear.... oops...

.... I used paper towel to remove the excess and soften the edges.
Tip: try not to go back in again with the brush, but control the paint by tilting the paper.
I also added more yellow to both pears, making use of the nice property of yellow (and also clean water) to push other colours away.
Since it was all very wet....
 ....I then waited till the whole painting dried.
When totally dry I carefully erased most of the pencil lines.
....I then waited till the whole painting dried.
When totally dry I carefully erased most of the pencil lines.


Then I added ultramarine blue, and softened edges here and there with a damp brush.
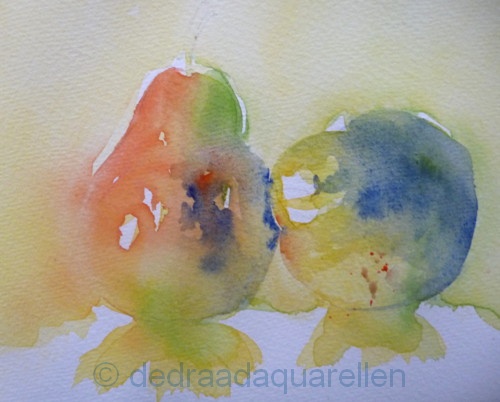
Then I added shadows and the last finishing touches....
and tadaaaaah.....
 |
| Pears for Irina and Pat |
Hoi Judy:) Je wordt nog beroemd man! Mag ik dan een handtekening? Wel heel mooi om te zien hoe je dat doet. Daar leer ik altijd weer van! Groetjes en een fijne avond:)
BeantwoordenVerwijderenHelloJudy! I'm preparing a post to show how I start the idea of my work and then how it develops ... and now I see as one of your comes, I am very happy! Open study to others is a very nice exchange! I love your watercolor- way !!!
BeantwoordenVerwijderenThis is a lovely step by step Judy, and resulting painting....great.
BeantwoordenVerwijderenWat een leuke uitleg Judy. Het is altijd leuk hoe een schilderij wordt opgebouwd.
BeantwoordenVerwijderenFijn dat je het leuk vindt, Renate! Mijn handtekening kun je altijd krijgen, maar beroemd weet ik niet hoor! :)
BeantwoordenVerwijderenHi Rita! I love to see how you work! It is nice to learn from eachother!
Thank you Ann! I have seen so many step by steps of your work, it was time to do one too. Glad you like it!
Fijn dat je het leuk vindt, Renske! Het is dat anderen het vroegen, anders was ik er niet opgekomen.
Thank yo so much.
BeantwoordenVerwijderenSounds so easy, he-he-he..
Great result and thank you for the step-by-step, again.
Hola Judy. Tienes una manera fantástica de realizar tus acuarelas. Gracias por mostrarnos este paso a paso de las peras. Un abrazo¡¡¡
BeantwoordenVerwijderenHi Judy. Great step by step. Interesting to see how you add things in layers and build up, keeping everything fresh. Thanks for sharing.
BeantwoordenVerwijderenHOLA JUDY:
BeantwoordenVerwijderenAdemás de felicitarte por la hermosa acuarela, te agradezco mucho que has compartido tus secretos para obtener tan bella obra.
Abrazos!!!
I'm glad you like it Irina! It is not difficult!
BeantwoordenVerwijderenHola Sonia, me alegro que te guste!
Hi Laura, I'm glad you like it!
Hola Mercedes, me alegro que te guste! Abrazos!
BeantwoordenVerwijderenHi Judy! Thanks so much to show us how you work!Now I know how you get this incredible light in all your paintings. Beautiful pears!Congrats
BeantwoordenVerwijderenHi, Judy,
BeantwoordenVerwijderenThank you for the precious time for spending in organizing the info. Lovely work and wonderful steps.
Kind regards, Sadami
Thank you for the step-by-step. The pears are really very well done.
BeantwoordenVerwijderenWonderful step-by-step!!! Beautiful results...thanks for sharing...
BeantwoordenVerwijderenAbsolutely lovely, Judy. And I do enjoy seeing a step-by-step process. Thank you!
BeantwoordenVerwijderenUne très belle évolution de votre aquarelle... belle maîtrise !
BeantwoordenVerwijderenGros bisous
Great result!
BeantwoordenVerwijderenFabulous, Judy - and thank you.
BeantwoordenVerwijderenI have to work the next three days, but I am going to do my best to try this before the weekend is out, if you don't mind!
xx
How nice to see your step by step, and the final result is fabulous !
BeantwoordenVerwijderenAnamaria, Sadami, Christiane, Hilda, Kathryn, Martinealison, Sissel, Jane: thank you all so much, I am glad you all like it!
BeantwoordenVerwijderenPat, you're welcome! I added another photo and some more info. Let the water do the work! You know I am not a pro and my way is just my way, but I love sharing what I know. Looking forward to your work! xx
Thank you Judy for this step by step ! I really like when I add the finishing touches, don't you ?
BeantwoordenVerwijderenWell you make it look easy ...but can you imagine the mess I get into? I get ink on me now ...but with paint!!
BeantwoordenVerwijderenVery interesting, Judy, thank you.
Hi Judy. Super post and nice to see the 'how and where' of those masterpieces! Love that BIG ceramic palette and the dishes too. You have a nice uncluttered work area ! You work flat ? ... me too, generally, then as you say you can pick the paper up and control the flow!
BeantwoordenVerwijderenHi Anne, thank you! Finishing touches make the painting!
BeantwoordenVerwijderenHi John! I admire your detailed work, since I don't have a very steady hand. I like the paint do the work for me! Thank you for your comment!
Hi Michael, I thought you might like a look at my work place! And I left most of the clutter out of the picture! :) The big palette is plastic and it has a lid. The little dishes are ceramic trays to put a used teabag on, bought in a local department store, I love them! Tapas dishes will do too, I read on a Spanish blog! I like my paints (yellows) to stay clean and they are easily cleaned.
Hi Judy, indeed a great post with your interesting step by step demonstration. I was impressed by your ability in working wet to wet, and also by how well you are organized with your palette and with the small colors containers. The final result is absolutely beautiful! Hug!
BeantwoordenVerwijderenWhat a great step by step process! I love posts like this. And the pears are perfect! :0)
BeantwoordenVerwijderenGreat step by step Judy! Thank You for sharing.
BeantwoordenVerwijderenDank je voor deze makkelijk te volgen stap voor stap demo van jouw schilderstijl. Dit zal iedereen zeker helpen die op zoek is naar andere manieren van schilderen met aquarel. Zeer nuttig stuk.
BeantwoordenVerwijderenCiao Tito, thank you! I wish I could paint other subjects as easily as apples and pears! :) Painting beautiful landscapes like you do requires lots of other techniques!
BeantwoordenVerwijderenSandra and Laura, I am glad you enjoyed the steps!
Cora, dankjewel! Fijn dat we van elkaar kunnen leren op deze manier!
thank you for the step by step - I always find it interesting to see how other artists work, great resulting painting, beautiful fresh colours and looseness
BeantwoordenVerwijderenEs una obra fantástica de una artista muy generosa por compartir con nosotros tus conocimientos. Gracias
BeantwoordenVerwijderen... it isn't that easy to take photos whilst working wet in wet ... you did a great job judy !
BeantwoordenVerwijderenSharon, Tina, thank you!
BeantwoordenVerwijderenJane, you are an absolute magician in wet in wet, my humble pears and apples are nothing compared to what you can do with watercolour! It is an amazing medium with endless possibilities and I love to explore further. Thanks for your visit!
Beautiful painting Judy and thanks for sharing, love your style.
BeantwoordenVerwijderenHola,
BeantwoordenVerwijderenestupendo tu paso a paso, y el resultado muy lírico, precioso.
Un abrazo
Thank you very much for showing this step by step, with fantastic pictures. It's great to see how you play with water. The result is really wonderful. xx
BeantwoordenVerwijderenSidmar, Rosa, Conchi, thank you!
BeantwoordenVerwijderenThank you so very much, Judy, for this insightful and very inspiring step-by-step! You made me want to grab the brushes right away... if I wasn't at work now :) I'm amazed that you manage to work wet-in-wet so well on this large size. Great illustration of the rule not to go back into wet color - something I know but find hard to follow. Also, it's great to see your workplace. What do you do with any left-over paint in the dishes?
BeantwoordenVerwijderennice to see your work in steps
BeantwoordenVerwijderenHi Blaga, thanks, glad you like it! I can only do apples and pears in this size. :) I just let the paint dry in the dishes, like you do in a palette, and they are easily stacked that way. Occasionally I clean them under the tap and use the cleaned leftover paint again.
BeantwoordenVerwijderenThank you Ashok!
Thank you for this interesting tutorial, Judy. The pears are lovely.
BeantwoordenVerwijderenHallo Judy,
BeantwoordenVerwijderenI just read your comments on my strawberries. Thank you very much for finding them nice. I just want to say that I like watercolor sprinkles,only that I thought I had done them too much in my strawberries. I saw others applying them in their works very artistically. Don't feel guilty, I really appreciated your suggestions. Please continue doing so. Cheers -:).
Maga, thank you, I am glad you like it!
BeantwoordenVerwijderenHi Cora, thank you for your message, I am glad you did not mind my suggestion about the sprinkles. Cheers!:)
Hola Judy, cuando puedas pásate por mi blog y mira la entrada del día 30 de junio. Saludos.
BeantwoordenVerwijderenExcelente paso a paso. Todos tus trabajos son muy interesantes.
BeantwoordenVerwijderenOh for goodness sake Judy! you are the best at this loose 'stuff'
BeantwoordenVerwijderenI told Pat it's what I strive for but never quite 'get it'
Going to try it 'your way'. LOL ! hugs BJ and thanks for sharing...
!!
Water, water en nog eens water. Prachtig.Groetjes, Marleen.
BeantwoordenVerwijderenSonia, thank you for the award, I shall mention it in my next post!
BeantwoordenVerwijderenHola Antonio! Muchas gracias por sus comentarios y bienvenido!
Hi BJ, thank you! My way is only my way, there are so many other ways!
Dankjewel Marleen! Groetjes!
Love the step by step images Judy - more please ;-)
BeantwoordenVerwijderenWonderful! I've got to have a go at this. ;-)
BeantwoordenVerwijderenHet ziet er erg mooi uit heel transparant groetjes Danielle
BeantwoordenVerwijderenLove, love, love seeing your process and how it all comes together! Many thanks!
BeantwoordenVerwijderenJerry, John, Danielle, Susan, glad you enjoyed it!
BeantwoordenVerwijderenFantastic lesson! Thank you for visiting my blog.
BeantwoordenVerwijderenCongratulation for your beautiful watercolors.
Regards
Wat mooi zeg, om het zo stap voor stap te laten zien en een toelichting.
BeantwoordenVerwijderenThank you Mercedes, and thank you for visiting!
BeantwoordenVerwijderenDankjewel Brigitte!
Beautiful! Love to see your process....you make it look so easy....but me and watercolour is like bull in china shop! I am very envious and in awe.
BeantwoordenVerwijderenHi Sharon, thanks! Well, I am envious of your wonderful drawing and painting skills!
BeantwoordenVerwijderenoh this is fun!! I love the end product...they look gorgeous. Was interesting seeing how you work!
BeantwoordenVerwijderenWaouh! superbe aquarelle!
BeantwoordenVerwijderenHow come I didn't see this one before! Sooo nice and thanks for the demo! One of my favorite.
BeantwoordenVerwijderen